Thursday, March 31, 2011

I Forgot that Easter Comes First


Easter Time!!

Hi!! Mother Hen Here! This is Barbara saying 'Happy Easter'!
Who would have thought that a sewing machine could make lace!
This cute Easter Basket is embroidered in the hoop and then sewn together.

It has bunnies & eggs on the ends, eggs on the sides and a carrot handle.


It takes a whole lot of thread, but what child wouldn't like this full of goodies!
Especially young ones that love to carry things around!


More Fun Mother's Day Gifts!

Birthday Calendars

I have put this in now, 5 times, and am annoyed!
When I go to place a picture, I lose a lot of my post.
Anyone know how to do this?
Help!! Please!!

ANYWAY! This is a great idea for those of us that have a
lot of children (9) and grandchildren (21) and can't
remember anything. This was more of a gift for me
than it was for them, but cute anyway.

This is Jacki's calendar. Juli was going to take a picture
of hers, but she'll have to put it in because I'm not doing
this again!

You start by having a 16x16 piece of sheet metal cut.
Put your 'Birthday Calendar' heading at the top and then
split the rest of the board into 12 squares.
Make a paper calendar with all the birthdays on it
so if you have a month that has a lot, you can make that
row longer.
The adults just have their day beside their name, but the children
have the year ('02') beside the day so I can see at a glance
how old they will be.


I chose cute ribbon and then picked cute flowers to match. You
can really personalize this to the person you are making it for!
I chose wired ribbon so I could arrange the ends.

Next, I took the flowers off the stem and cut some of the back off so
it wouldn't stick out so far. BE CAREFUL not to cut too much or
your flower will fall apart! If so, hot glue them back together. Cut the
leaves off the stem and hot glue them onto the back side of the
flower with part of the leaf sticking out past the flower.
Then glue a magnet onto the back of the leaves.
I made three flowers for each board so that
they could arrange them however they wanted.

Voila! A wonderful gift for those that have trouble
remembering! If I were to do it again, (& I may still do it
to mine), I would get colored tape to match the
ribbon and flowers to put around the outside of
the sheet metal. The corners are pretty sharp otherwise!
Have fun adding your own creativity.

Lace Bookmarks

Here are some Lace bookmarks that I have sewn. I have them for 'Mother',
'Daughter', 'Sister', 'Friend', & Love. I had more 'Sister' ones done but I gave
them to the ladies I visit every month. Of course, I forgot to take a
picture before I gave them away. You could use ribbon, cording. braiding.
Almost anything will work. Fun thing to give your friends & family.


Hope you all have a great weekend!
Next week I will show you the cute hooded towels I have made for all
the grandkids. Then we'll start on the 'DARLING' Minkee blankets and
bibs. It's been fun. Thanks to all of you for your comments & support!

"Spring" Sign


Spring is FINALLY in the air, for a couple of days at least!
I saw a similar spring board on a blog, but have no clue where.
I put my own little spin on it and I think it turned out cute.

Items you'll need:
Board
sand paper
circle stickers
paint of your choice
stencils, Cricut or letters
Mod Podge
ribbon

This craft didn't cost me anything because I had all the supplies at home. I have no clue where I bought this board, but I'm glad I can find a use for it. I saw some boards at Dollar Tree that had lame saying on them, that you could just paint over. Or they have some at JoAnns.
Here we go.
1. I sanded the rough areas.


2. Put your round stickers where ever you want dots. I learned this at one of those pottery places. It works well most often, but it depends on your stickers. I use random sizes because I didn't want all the dots the same. (FYI- the stickers on the sides didn't work as well as I hoped. It could be user error though!)

3. Paint your board with a light color. I ended up doing three coats because it wasn't as light as I wanted. It still ended up too dark by the time it dried, but I was done by then.

(Sorry for the horrible pic)
4. Let your paint dry all the way, then peel off your stickers. Presto. Perfect circles.
5. Paint your circles the colors you want.
6. Cut out your letters. I used Cricut's Lyrical because it had a shadow as well as normal letters.
7. Mod Podge your letters on as well as the whole board ( to get that glossy look!)


8. Put a cute ribbon as decoration.
9. Put on a cute stand. This stand I found at Dollar Tree. It had the word "friends" on the front and was black. I just took the word off and spray painted it white. I think it goes well with the sign and for $1.00 it fits my budget.

What decorations do you use in your home for spring time?

Wednesday, March 30, 2011

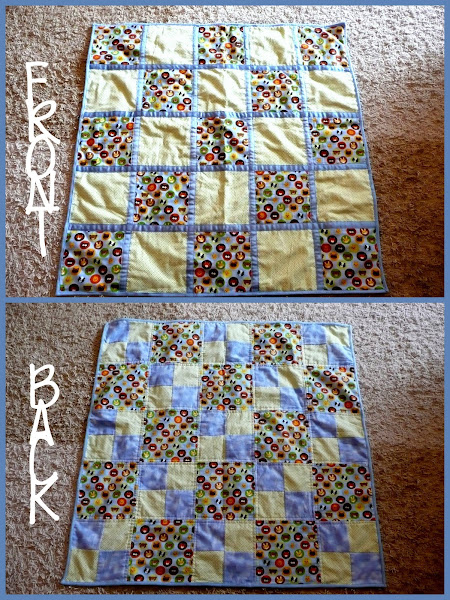
Ribbon Baby Quilt

here is a cute and pretty easy baby quilt. my amazing quilting friend made one and after i saw how cute it was i had to make one too. she got the idea from watching an episode of Fons & Porter on KBYU. i have searched the site to find instructions but have not been successful.

here is quick run down of what i did....

*the squares big squares are 8 1/2 inches and the smaller squares are 4 1/2 inches

*sew 4 smaller squares together to make a big square

*lay alternating squares on top of each other wrong sides together. by doing thins one side will have the seams facing outward.

*to cover those seams up top stitch ribbon down (i used 1 inch ribbon). i sewed the seams that are vertically first then horizontally.

*bind it how ever you would like

it really is pretty simple and goes pretty fast once you know what you are doing. i have a few friends having babies in the next few months so guess what they are getting!!!!

Tuesday, March 29, 2011

Cupcake Cones

My sweet little baby turned 1 this last Sunday!


Did you throw a huge birthday party for your kiddos first birthday? I know we did with our first, but by the time we got to our third, we realized that she wasn't going to remember it anyway. We decided just to invite family this time, and I think it was just fine. We made a #1 cake for her to make a mess with, but I needed something for the cousins that were coming to the party. Have you seen these before?


Cupcake Cones!! I can't believe I've never thought of this before!! While searching online for different treats, I found multiple pictures of these awesome creations! One lady was saying her mom made these for her when she was little, and I've never even heard of them! I made these for the party, and they were a hit! I have to say that the cleanup was the best part! No cupcake wrapper?! No bowl or plate to wash?! Fantastic!
Here's how I made them!

First of all, you have to find a way to keep the cones from falling over while you take them in and out of the oven! I covered a muffin tin with aluminum foil, cut an x in the middle of each hole, and gently put the cones in.


I put my fresh from the box cake mix in a plastic bag and cut the corner so I wouldn't make such a mess when filling the cones. It actually worked out pretty well!


*don't mind the dirty oven and horrible pics!!

I followed the directions from the box recipe as to what temperature to cook them at. I set the timer for 17 minutes, which was the time for cupcakes, but they weren't even close to being done. I think I ended up cooking them for 25-30 minutes. They brown on the top, just like regular cake, and that's when I knew they were done. Make sure to let them cool before you frost them. I put my can of frosting in a ziploc baggie, cut the corner, and piped on the frosting. They were a hit with the kids, and even some of the adults! I thought they were good, but the texture of the cone took some getting used to! I will definitely make them again since they have such an easy cleanup! I think next time I'll put less batter in them so maybe I can scoop some ice cream on top when I serve them! Mmmm! Ice cream cupcake cones!! Sounds delicious to me!!

Monday, March 28, 2011

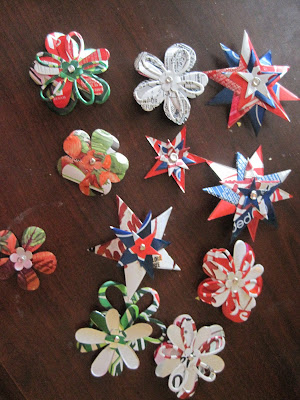
Pop can Flowers


A friend of mine (stamptimesomewhere.blogspot.com) started making these and I thought I would try my hand at them as well, while taking photos through the process.


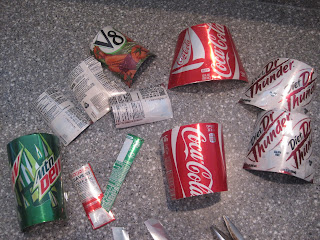
This is what I started with. As you can see I added a Pepsi can later on.


I removed the top and bottoms and cut the can so it was a metal sheet.
It got easier the more cans I did.


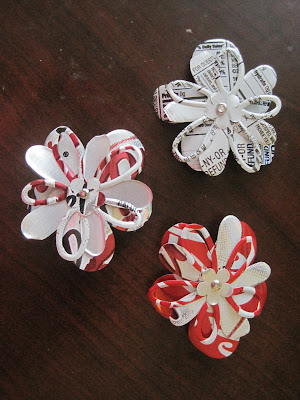
I liked keeping the nutritional part for a cute white and black flower too.
Also this is two cans of Diet Dr. Thunder and Coke, not cut in half.


And it made all these. I used my Sizzix Big Shot and dies to cut out the shapes. I also used my paper punches too. Whatever you use should be fine, maybe a cricket can cut metal too, I don't know for sure. I needed a Pepsi can at this point because I couldn't do stars with out Red, White, and BLUE!!!


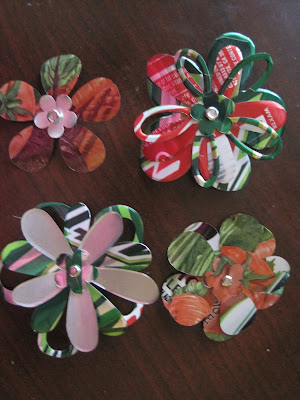
Then I just put them together using scrapbooking brads and Whalaa!


Note the cute black and white one from the nutritional content.


I also turned some upside down to add the silver instead of the color to the flower.

So my friend is making them as Hair Bows or you can add them to a cute craft, whatever you want. And it only cost me $.62 because I had to have a Blue can. All the other stuff I had so...Hope you Enjoy!


Thursday, March 24, 2011

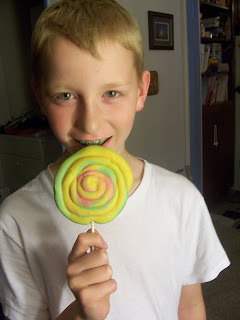
"Play Dough" Lollipop Cookies

It's raining, it's pouring, Jacki is BORING!
Yep, that's how I've felt the last couple of days. It has been raining nonstop and
pretty soon I should start making my ark like Noah or the flood
waters are going to take me away.
I have really been missing the sun and wanted something cheery.


I saw these cookies over at The Idea Room and have been
trying to make them since February.
I figured now was the time, since they're so bright and happy. :)

"Play Dough Lollipop Cookies"

Ingredients:
3/4 cup butter, softened
3 ounces cream cheese
1 cup white sugar
1 egg
1 teaspoon vanilla extract
3 cups of flour
1 teaspoon baking powder
1/4 teaspoon salt
Assorted food coloring (paste works best)
24 lollipop sticks

Directions:
In a bowl cream butter, cream cheese and sugar until fluffy.
Add egg and vanilla; beat until smooth.
In medium bowl combine flour, baking powder and salt.
Add dry ingredients to the creamed mixture. Stir till soft dough forms.
Divide dough into fourths. Color each with different food color.
Wrap in plastic wrap and chill for 2 hours.
When ready to bake, preheat oven to 350 degrees F.
Grab a little of each color and roll each into a ball.
Put one of each color together to form one big ball.
Now start rolling it between your palms into a snake like rope about 12 inches long.
Starting at one end coil the rope into a round cookie.
Place cookies on a greased baking sheet about 3 inches apart.
Carefully insert a lollipop stick into the bottom of the cookie.

Bake cookies for 12 minutes or until lightly brown. Cool and store in an airtight container.

We enjoyed these cookies and I really felt like I was playing with play dough. Next time I think I will let my boys make different designs out of the dough instead of doing the lollipops.
Hope your family enjoys making them as well.
Hope Spring comes SOON!

Wednesday, March 23, 2011

i am a child of god....

here is a cute and super easy craft for a baby gift
that could go along with one of jess's super cute BaBy CaRdS

i received one of these from a dear friend after i had my baby and loved it
so i thought i'd share it with all of you

**no this is not her name or her info**


seriously this is super easy

all you need is...
a computer (preferably with super cute fonts)
paper
picture frame

here's what to do....
1. just type this up in what ever word document you have
2. leave the words to the song black
3. change the words of the info to other colors
4. print
5. cut to fit frame
6. insert into frame
7. give to the new mommy and she will cherish it forever!!!

and there you have it: a super cute baby gift that you will have made with no sewing or glue involved....can't get any easier than that!!!

oh and if you're not lds than this project may not make a whole lot of sense to you but is still cute nonetheless. the words come from a song that is taught in primary to all the kids. click HERE to find out more about it.

Tuesday, March 22, 2011

Family Home Evening Board

Hello there!!! Juli here!....Finally!  I was supposed to post this earlier this morning, but life was a bit too hectic. Plus, the little bit of time that I had to work on my craft was interrupted by this
and this

The sun finally graced us with it's presence today, and I couldn't resist taking the kids out to play!
Anyway, on to the fun!!

I've been wanting to make a Family Home Evening board for a really long time. If you're not familiar with Family Home Evening, it's a night set aside by our church to spend time with our families. We like to give each person a different job, whether it's the lesson, game, prayers, scripture, or treat. My kids love FHE, but it's so hard for me to get motivated to do it. I found this idea over at Gluesticks which I loved! So I pulled out my Cricut and my Paper Dolls Cartridge. That cartridge is amazing. There are so many different dolls to make. The kids and I had so much fun! So here's what I came up with.
I just love it! If I did it again I wouldn't do the blackout for the letters. It makes the O, P, D and R look funny. Oh well....next time. 
So just like my 'epic fail' wreath :) , I just used cardboard for the base. I picked out some scrapbook paper from my stash, and off I went. It was actually really great to get rid of some of my leftover paper from other projects! I used sticker paper for the lettering. If you haven't tried it, you should! It's scrapbook paper that's sticky on the back, so once you cut it on the cricut, you can just peel and stick. Definitely easier than trying to glue every single letter. For the different FHE jobs, I did a cheap version of laminating!
Yes, that is packing tape!! I'm sorry, but I wasn't going to head to kinkos to have those little things laminated. Plus, I'm really trying to do projects that are FREE!!! I used velcro to stick them to the board so we can rotate the jobs each week.
Once I'd put it all together, I used my chalk to add highlights and dimension to the dolls. Overall I'm SUPER DUPER happy with how this turned out! :)


Thanks for reading!! Make sure to let us know what you think!! We love comments!!

Juli

Linking up here

Sumos Sweet Stuff

Monday, March 21, 2011

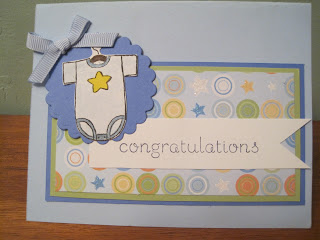
Baby Cards

Hello again! In this family people tend to have babies in March, so I have been in the baby card mindset. No one is pregnant in the family but just in case I have them ready. Hope you enjoy!


LinkWithin

Related Posts Plugin for WordPress, Blogger...