Tuesday, May 31, 2011

Hair Clips for Mommy

Hello there!! I've been on a hair clip kick for the last couple of weeks, so that's what I'll be sharing with you again today! My good friend Natasha turned 30 a couple weeks ago. Since I know she likes to wear flowers in her hair, I figured I'd make her a few hair clips.
I wanted these to be a bit more classy, since they were for an adult.
Here's the first one one I came up with


What do you think? All I did was take the flower apart, and glue it back together piece by piece. For the center, I used a bigger pearl that I had, and surrounded it with mini pearl beads. I glued a larger hair clip to the back of the flower. I really like these hair clips that I found at Joann's that stay a lot better in an adults hair.


The next flower I made using blue silk fabric from my stash.


This one took a little bit more time. I cut circles out of the blue silk, and cut every other circle out of some grey tulle I found in the remnant basket at Joann's. Once you have all the circles cut, you burn the edges of each circle. This is what makes them curl up. At first I tried burning the edges of the tulle too, but in the end I think it looks better leaving the tulle unburned. Here's what the tulle looked like when it was burnt.

I definitely like it better leaving the tulle as it is.

I didn't get a picture of the back, but I glued this flower to a circle of felt. Then I glued another circle of felt to the first circle, but I only glued the sides of the circle. This left the middle part of the circle unglued, so she could slide it onto a headband or slide a clip through the gap, and just put it in her hair. I made another accessory that I didn't get a picture of either. I made three rolled felt flowers, glued them in a bunch on a piece of felt, and then glued another piece of felt to the back, leaving the middle unglued. I liked how versatile all these hair clips were, so that she could use them in so many different ways!
Sorry I don't have pictures of the last one!

What do you think? Will you be making one of these for yourself??
That's all for today!! Thanks for reading!!
Juli

Linking up to these fabulous link parties!!

Monday, May 30, 2011

Family History

On this Wonderful Memorial Day I want to share with you how I remember the amazing people who have left such a wonderful heritage for me. I can't believe that most of these people have passed, but I am so thankful for them and all they have done.

My home is decorated in an antique/contemporary way.
I love antiques and the way they hide all the wear and tear that my kids put on my stuff.
So I made this collage by the entry way of my house.
It has photos of me and my husband's parents and grandparents.


This one has photos of our grandparents on or around the time they got married.
I got this frame from JcPenny but it didn't really fit in being so white,
so I added some brown paint to give it an older feel.
My Grandpa served in the Navy in WWII. Didn't he look handsome?


This one I made myself, the frames I glued to the ribbon and made the cute bow.
I actually used epoxy that we had on hand because the frames were so heavy
I needed something that was going to hold Really well.
My husband helped me by bending a nail into a hook to hang it from.
These photos are of Mother Hen as a baby (in the middle) and her Mom and Dad.


This one I got from a friend and added the pictures of my Father-in-law(on the left) and his dad(on the right) as little boys. I added the Family in black vinyl tying it all together.
I love how it all turned out. I once had some hand dipped candles hanging from the hooks,
but my boys destroyed those soon after.

All the pictures are just scanned into my computer and printed off.
The black and white is easy to copy and hides the wear on the pictures.
I love the old feel.

I hope we can all pay our respect to those who have come before us
and those who have served our country. Thank You!!!

Friday, May 27, 2011

Mom's Homemade Bread

Hi! Mother Hen is FINALLY back!!
I have spent the last three weeks in Nevada and California
doing our Texas Twister Drinks!
While I was there, I got to spend lots of time with

Jacki and Juli and my cute grand-kids and son-in-laws!
Thanks Jacki and Juli for a wonderful time!
(I have just lost my whole post. I shouldn't have played with it.)
Hope I can remember what I wrote!?! Arg!
I hope at some point and time, I can write a post JUST ONCE!!!!

On Tuesday, while I was there, Jacki asked me if I would
teach her 'Young Women' class how to make bread.
Every time my kids come home, there are always some things they want to eat.
BREAD is one of those things!

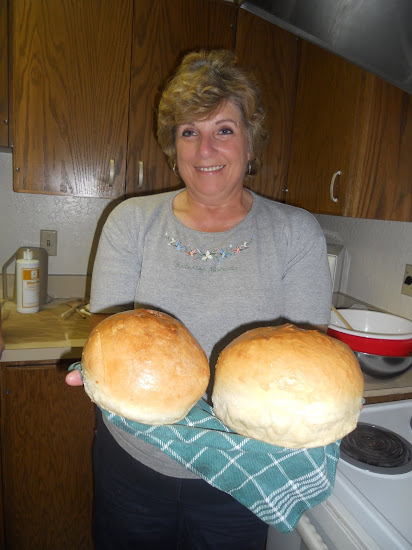
Here I am with Jacki on Bread Making Day!

It brought back so many memories!
I learned how to make bread in 1973 when I was pregnant with
my oldest daughter (JaNae).
I used to get together with a great friend: Kathie Hunter,
when we both were young married ladies!
We both wanted to make bread, but I hated to get my
hands all sticky with dough, and she hated to get
her hands all dry and floury. So.......
I put the ingredients together, she mixed the dough with
her hands, and I made the loaves and rolls.
It was a GREAT system!
Then after it was done, we would split the goodies.
We did that for a long time and then I got a Bosch Bread Mixer!!!
After all those years I had forgotten how much I hated
getting my hands sticky. It only took mixing up a batch
with the Young Women to REMEMBER! Yuck! Thank Heavens one of the
leaders jumped right in - - -up to her elbows (and all
down her front) and used her hands to mix the dough
while I helped the girls get theirs going.
(Love you Karey!!)

The girls did an awesome job and I think they had fun doing it.
They each made a loaf and some rolls.
Earlier in the day, Jacki made a batch of bread,
I made a large batch and the girls each made a small batch.
That way they could each eat some but have some to take home too!

We had to use both ovens in the church and then put
the last pan in after the first two ovens were done.

When the bread was just about done and smelling very yummy, all of a sudden the kitchen was full of Scouts, leaders, other classes of girls and anyone else
that was in the building!

We had enough bread that everyone that came in got at least one piece
(and often the boys had more - - of course)
and the girls still got to take a loaf and some rolls home.

Here are a couple of the loaves I made.
There absolutely is nothing like warm bread and butter!
(Peanut butter makes it even better)
I always make the large batch, put them into 4 or 6 round loaves, or make them into rolls.

Here is the recipe for the bread. Both size batches are on the card.
Jacki did an awesome job of making cute cards for everyone.


Now some thoughts on making bread:
If you are in a hurry (which I always am), after I have mixed the dough, I make it into the loaves, and having preheated the oven, pop them right in to bake.
I don't know if it makes any difference, or what difference it does make,
but it gets done fast and I've never had a complaint on the taste or texture.
Keep an eye on the bread. You'll get so you can smell when it's done, but a lot of things affect how long it takes to cook. Summers in CA are very humid, while summers in UT are very dry! Some days it may take longer than others. If the top is getting brown before
the bread is done, put a piece of aluminum foil over the top with the shiny side up.
That will deflect the heat so your tops won't burn. Make sure you put your pan in the middle of the oven length wise and width wise so all sides get equal heat.
You can also experiment and make cinnamon rolls with the dough. Roll it out, spread butter all over it, sprinkle on cinnamon and sugar and roll up. To cut them you can either use a knife, or put a piece of thread around the roll, cross it and pull and you will cut right through the dough. The kids always loved it when I stretched out small pieces and made scones. Just fry them in a little bit of oil an add what ever toppings you'd like!

Hope you all run in and make a batch of bread. It is truly delectable!!
Your husbands or boyfriends, parents or friends will really be impressed.
As you are reading this, I am on a 14 day cruise to ALASKA!!
It will be interesting to see what I come up with for next week.
Have a great weekend! Thanks so much for reading!!
Mother Hen - Barbara

Thursday, May 26, 2011

Recycle Your Kids Pants


Does any one else have a pile like this?
Pairs and pairs of good pants ruined in the knees with holes?
Drive me crazy!
I was getting so tired of looking at holes in the knee that I started making a pile. Which grew into a basket full. I was determined that I was going to make them into shorts.

Never a better day like today, Right?!

So I pulled them out, 11 pairs of pants. No wonder my 9 year old has no pants/shorts!

I will admit that I'm not a great seamstress like my SIL, Heather.
I can sew very simple items, possibly a dress. It takes so much energy though to get out my sewing machine and all my supplies, that I would rather just craft. (Those supplies are already out!)
I also have a very old sewing machine, that is very finicky.
I'm determined though!

*So first, I g0t out a pair of shorts that fit my child.
*I measured how long I need the shorts and than add a little bit more so
I can roll the seam under.
*I then cut the pants the length I want.
Tip: If you have a rotary cutter and a yard stick use those. I used scissors on the first
and the cutter on the second. The cutter makes a straighter and nicer cut.


*I folded the seam under twice so the frayed end is on the inside.
Tip: My sewing machine did not like the original seam on the jeans. I ended up sewing right up to the edge. Than I hand stitched the seam so it would stay in place.
Tip: When hand stitching. Use the jean to push your needle through. Saves your finger!


And this is the ending result.


Not bad huh?! I think if I do this again I will try and find thread that matches the jean's thread. Like my Grandma use to say, "A man on a galloping horse won't notice."
That's good enough for me and saves me a little bit of money.

In what ways do you save money? Let us know!

Jacki :)

Wednesday, May 25, 2011

{Bored No More}


School is almost out for us and to try to keep my kids from driving me crazy with
"I"M BORED" or
"THERE"S NOTHING TO DO" or
"I DON'T KNOW WHAT TO DO"

I scoured the web and found the idea to do a
"BORED NO MORE" Jar

The purpose of the jar is that if one of my kids come to me saying
"I"M BORED"
then they HAVE to pick a paper out from the "BORED NO MORE" Jar
and then they HAVE to do what ever it says...not if's, ands, or buts

They might get lucky and pick: run through the sprinklers,
paint a picture, go get an ice cream cone from Macey's

or they might not get so lucky and pick: clean the bathroom mirrors,
empty the dishwasher, collect all the garbage in the house, do a book report

hopefully the point I can get across to my kids is that they need to figure out something to do by them selves or else they might HAVE to do something they didn't want to do in the first place.
It's their choice and if they pick something not fun then oh well they have to still do it.

(I am not a cruise director.....I can't entertain them all day every day)

*************************************

To make the jar I went to my local thrift store and found a jar to use...it only cost me a $1.
Then I just cut out the words on my Cricut and put it on the jar.
I then sat at my computer and thought up of all the things to put into the jar.

Here are some more ideas:
play with play-doh
wash the car or your bike
color a picture and mail it to the grandparents
put on a puppet show
clean the toilets
dust the staircase
play Memory

I have about 50 things in the jar so....
hopefully this won't be a BORING Summer after all!!!

Tuesday, May 24, 2011

Baby Gift

Hello there!!! Thanks for stopping by!!
Last week I posted about these hair clips that I made for my friend's new baby.  So today I thought I'd show you how the gift turned out and how I gave it to her. 


I hesitated buying outfits for the baby, because this is my friends second girl. Bur who can resist those adorable little girly clothes?!?! I know I can't. So I bought her a couple different outfits and headbands to match. Then I made the hair clips to go with each outfit.
I found the basket at dollar tree, and the ribbon was all from my stash. I rolled up diapers for the bottom half of the basket, 'cause who couldn't use extra diapers for a newborn?! Then I rolled each of the outfits, put the headband around it, and clipped the hair clip on. Then I just tied a bunch of ribbon to the handles. I think it turned out so cute, and it's definitely a unique way to give a gift. She can use the basket to store baby items, which is a lot more useful than a gift bag.

Well, that's all for today. Next week I'm going to share some hair clips I made for my friends 30th birthday, so stay tuned!!
Thanks for reading!!
-Juli-

Monday, May 23, 2011

Teacher & Birthday Cards

It is the last week of school here so I made this card for my oldest's preschool teacher. He loves worms so I thought it was fitting.

He wrote her a cute note too.


It was also my other son's 3rd Birthday on Saturday and he looooves Emus. So I made him an Emu card. He loved it and carried it around with him for a while showing people. I think he is one of a kind!!!

Thursday, May 19, 2011

These Hands Will Hold My Heart Forever!


Every year I try and make something for my Daycare parents on
Mother's Day and Father's Day.

Sometime it's a paper plate with their hands, other times it's candy with a cute saying.
I have done daycare for about ten years, so my ideas are running dry.
I saw this post over at Clean and Sensible and
thought it was something I haven't tried yet.
I'm posting it now for multiple reasons.
First, so we have an archive for next year.
Second, who wouldn't love to get this for a birthday,
anniversary or other important day.

I went to Wal-mart and they had two canvases for, I think, seven dollars.
I painted the canvas white and than
painted a red border.
I put the boys hand prints on first, which was

hard with an almost 12 month old. I think it turned out okay though.
After that dried, I Mod Podged the letters and hearts on. I also went over
the whole canvas with Mod Podge, so it would have a glossy look.
I attached
a red ribbon on the back to hang.

This didn't take me very long, just the time for drying.
I love that it has the two boys hands on it, the size difference is so cute.
Wouldn't this be fun to give to a Grandma?

Have a great weekend and I will talk to you next Thursday!

Jacki :)


Tuesday, May 17, 2011

Flower Hair Clips

A few of my friends have had baby girls lately, and I've been loving that I have an excuse to make cute little hair things again! I bought a few outfits for each of the babies, and am making a hair clip to match each. I am in love with this first hair clip I made, and will definitely be making a few for my little girls.


Here's what you'll need:

I forgot to picture my trusty glue gun!!

I've had the flower ribbon forever, but I'm pretty sure I got it at Joanns.
The mini pearls and hair clip I found in the jewelry section at Joanns.
So I started out by cutting two pieces of felt to cover the clip with.
You could just as easily use an alligator clip, but I like the look of the felt.
Cut the flower ribbon into individual flowers, and begin gluing them to one of the pieces of felt.
I just did a layer around the outside so you wouldn't be able to see the white felt as much.


Next, I took one of the flowers, put a dab of glue on the center, and put a mini pearl on it.
I kind of folded the petals up over the pearl so when it dried it would appear 3D-ish. :)
I had to make 13 of these to cover the top.


Once you're done covering the top, you need to attach the clip to the other piece of felt.
I put the clip on top of the felt and put dots where I needed to cut.


Cut a line between the dots, and put the clip through


I glued the clip to the felt, and then glued the two pieces of felt together.


And that's it!! I love that you can either put it in their hair or clip it on a headband. So cute!


Look at these other adorable clips I made! So much fun!


Thanks for reading!!

Monday, May 16, 2011

Best Apple Pie in the WORLD!!!

I found this recipe on a website a long time ago and I always get rave reviews.  It is simply amazing! It is half apple pie, half apple crisp. Be warned though this is not a low fat food.

This is taken before Caramel was drizzled on top.

For Pie


Crumb Topping


Final Topping

  • 1/4 cup caramel ice cream topping
  • 1/2 cup chopped pecans

Directions:

  1. Prepare pastry for single-crust pie, being careful not to stretch dough too much.
  2. Place in pie plate and trim and crimp the edge.
  3. In a large mixing bowl, stir together the sugar, flour, cinnamon, and salt.
  4. Add apple slices and gently toss until they are coated well.
  5. Transfer mixture to pie.
  6. FOR CRUMB TOPPING: Stir together brown sugar, flour, and oats.
  7. Using a pastry blender, cut in the butter until topping resembles coarse crumbs.
  8. Sprinkle over apple mixture in pie.
  9. To prevent over-browning while baking, cover edge of pie with foil.
  10. Bake at 375 degrees Fahrenheit for 45 minutes or until top is golden.
  11. Remove from oven.
  12. Drizzle top with caramel topping; sprinkle with pecans. ( I omit pecans because I just don't like them)
  13. Cool on wire rack and serve!

Read more: www.food.com

Wednesday, May 11, 2011

{freezer paper stencil birthday shirt}


i never knew how easy and simple freezer paper stenciling was
Dana from MADE has a GREAT TUTORIAL for it (you really should check it out)

i made this fun shirt for my son who recently turned 6


i saw a shirt like this on some other wonderful craft blog but since
i follow so many of them i can't remember where exactly i saw it

what i did was.......

typed up the logo in a WORD document
printed it out
traced it onto the freezer paper (shiny side down)
used an exact-o knife and cut out the pieces i wanted to be painted
ironed the freezer paper to the shirt
applied fabric paint
let it dry for a few hours
peeled the paper off
ironed the shirt to set the paint

such a fun and easy project
and now my 3 year old is expecting one for her 4th birthday

Tuesday, May 10, 2011

Belated Mothers Day

Hello there and Happy Belated Mothers Day to all you fabulous women!!
I planned to have these Mothers Day gifts ready to share with you
last week, but it just didn't happen.
So I'll share them with you now, and you can use them next year!!

In last weeks post, I told you I was going to make my own version of this vase


Well, I'm not sure it turned out like I wanted, but it's the thought that counts, right??
I made it for my step mom, who between her kids and my dads kids, has 35 grand-kids.
So I had my work cut out for me!!


I had to pick a pretty big vase since I had so many names to fit on it,
and they just barely fit on this one.

I wanted to share this awesome product I found!!
You may all know about it, but this is the first time I've used Sticky Out.


I hate picking off the price tags or UPC labels, and this stuff made it so much easier!
I just put a little bit on the sticker, let it sit for minute or so, and then wiped it right off!!
So much easier!!


So I started off with my trusty mod podge and some tissue paper.
I applied mod podge and the tissue paper in small sections, smoothing it as I went.
I liked the frosty look it gave the vase.
Then I cut out 3 different kinds of flowers with my cricut,
and put each of the kids names on circles for the center of the flower.


Then I mod podged the flowers, along with the words, onto the vase.
I covered it with two coats of mod podge, and am hoping that will be enough to seal it.
Overall I think it turned out really cute, and my step mom loved it!


The other Mothers Day gift was one I found at Our Best Bites.
They had the best idea for tin can treats for mothers day.


I gave these to a few ladies at church, as well as my mom and sisters. They were really easy and quick to make. I also made a few for my son's teachers since this week is teacher appreciation week. You can download both versions from Our Best Bites website. Such a fun gift!!

Well, that's all I have for this week! Thanks for reading!!

Monday, May 9, 2011

So Thankful!

Last week my 4 1/2 yr old was in the hospital for asthma and pneumonia. I was so thankful for the nice nurses that tried so hard to make him comfortable and happy. So I wanted to make sure I left them a Thank You card. They all deserve a nice thank you. It just happened to be National Nurse week last week and I hope all of can thank your nurse the next time you see them for all the hard work they do.


Thanks for stopping by and I hope you enjoy!

LinkWithin

Related Posts Plugin for WordPress, Blogger...